How to Fix Netflix Error M7703-1003?
At times, in the midst of streaming videos, you get an error message named Netflix Error M7703-1003. Here is your step by step guide to Fix Netflix Error M7703-1003.
Checking Widevine Content Decryption Module
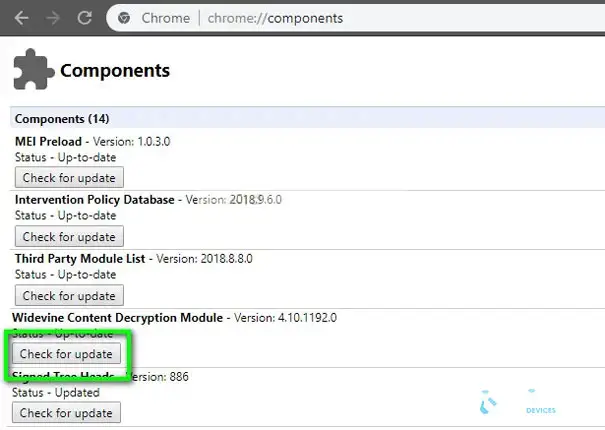
The Widevine content decryption module is preinstalled in google chrome and new versions of Mozilla Firefox that allows DRM (digital rights management) protected HTML5 video and audio. You don’t have to install it as it is a built-in Widevine Content Decryption Module.
- Go to the chrome and type “chrome : / / components / “ in the address bar.
- Now scroll down to the bottom of the page and you will see the option “Widevine content decryption module”.
- Now you have to click on “check for updates” under the above option and see if there’s any update.
- Once you are done making the changes, restart your computer system and launch Netflix again.
- Lastly, check if the error message still appears.
Removing Chrome Configurations to Fix Netflix Error M7703-1003
Now in case, the Widevine didn’t work as expected, then try resetting your device but remember that by doing so, all of the settings, information and configurations will get erased.
The reason behind resetting is to make sure that there are no bad or corrupt files left that might trigger the issue.
- Before starting the procedure, we would recommend you to always create a copy of your configurations in a separate folder so that if the method doesnt goes the right way, you can set the configurations back to the way it was.
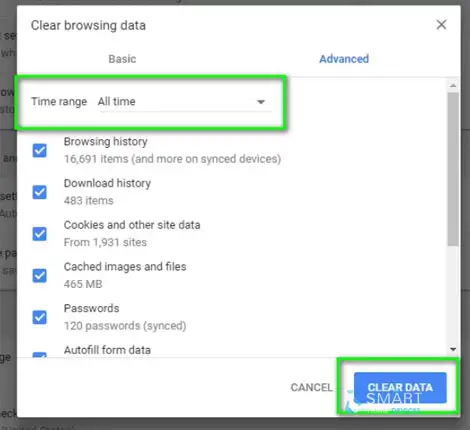
- Next, you have to do is to clear your browsing data. Below is the procedure to do that.
- Open the google chrome and type “chrome: / / settings “ in the address bar and then press Enter.
- The browser’s settings will appear on your screen and then while you scroll down the page, click on “advanced”.
- Once you are at the advanced menu, navigate down, and select Clear browsing data.
- Ensure that all the checks are enabled in the new popup and the time range is set to All time. Click on “Clear data” in order to delete all your browser data.
- Lastly, restart your computer system and check if the issue still exists by playing any video in the Netflix.
- In case you are using Ubuntu, you have to:
- Go to the terminal window on your window > type the command sudo rm -r ~/.config/google-chrome
- You will be prompted for an administrator password and then restart your system.

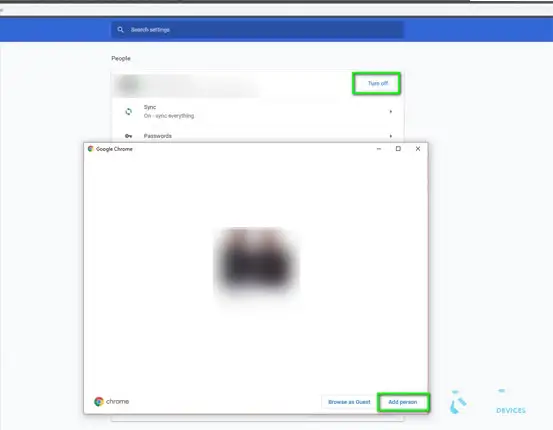
Through Other Profile
- In chrome’s taskbar, click on the profile icon and then click on the “profile settings”.
- Tuen the sync off and then click on “manage other people”.
- A new window will appear on your screen and then click on “Add person”.
- Once you have created a new user, log in as that user and restart the chrome.
- Make sure you log out of your current profile so that the settings get erased.
- you can also execute the following command in the terminal to backup your existing configurations settings. When Chrome notices there isn’t any, it will automatically create a new one.
- cd ~/.config/google-chrome/mv Default Default-bkp
- Lastly, try to restart the chrome and then add Netflix as a shortcut and then launch it.
What is the Reason Behind Netflix Error M7703-1003?
Amid the Netflix streaming, the error message will pop up in both Linux and Windows operating systems. Your browser configurations might be the reason behind the issue. Usually, Netflix Error M7703-1003 occurs due to the following.

- Due to the corrupt or bad modules in Google chrome.
- Due to the corrupted Google chrome profile.
- Due to the Widevine extension on Google chrome for Netflix. This module allows Chrome to play DRM-protected HTML 5 audio and video.
We hope the above article helped you to Fix Netflix Error M7703-1003.
Also Read:
 Published by: Blaze
- Brand: Netflix
- Last Update: 1 month ago
- Reading Time: 4 min
 Related Blogs


Top Searches in netflix