PCSX2 is the first-ever PS2 emulator introduced in the market. It was launched years ago but it still is one of the most amazing emulators available today as it offers excellent game compatibility and has a plugin. If you wish to enjoy some PS2 titles on your computer, then here you will get to know all about how to set up PCSX2 BIOS. This will allow you to play PS2 games.
There are several emulators that are difficult to set up and install. However, PCSX2 is different from other emulators. It has an installation wizard that makes the installation process as simple as installing some other software on your computer. Once you are done downloading the emulator, these are the steps that you need to follow.
Step 1: First, go to the folder where all the installed files are kept. After that, double-click on "pcsx2-1.4.0-setup.exe".
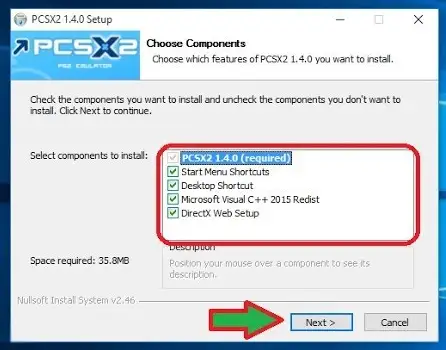
Step 2: Now, a pop-up screen will appear before you, there choose the components that you wish to install. After that, select Next.
Step 3: Accept the terms to install Visual C++ and then click on install.
Step 4: This will install the PCSX2 emulator. Therefore, it is important to configure before playing the game.
Once you are done installing the emulator, it is your time to configure it to ensure that you run your games properly. Below are the steps that you need to follow to configure and setup.
Step 1: Go to the list of Start menu program and search for the PCSX2 folder. Now, run the program.
Step 2: Now, you will see the screen of the First Time configuration. After that, click on Next.
Step 3: Take a look at plugins available that came along with the PCSX2 emulator. After that, select "Next".
Step 4: Now, the BIOS screen will open up before you. After that, click on "Open in Explorer" given in the lower right corner.
Step 5: A prompt will appear, which will tell you that "the path does not exist". If you wish to create it, then select create.
Step 6: Minimize the window of configuration and then go to the folder where BIOS is installed. Launch the folder and drag the unpacked files.
Step 7: Maximize the window of First Time Configuration. Now, check the available regions by selecting "Refresh List". You will see the USA, Europe, and Japan files in the White Box.
Step 8: Choose the region and then click on Finish for completing the setup process.
Step 9: PCSX2 is installed now and you can run it.
 Related Blogs

Top 11 Best Smart Home Devices & Systems of 2026

How to Use Google Lens on iPhone?

Top 7 Best Smart Home Security Systems of 2026

How to Connect Philips Hue Devices?
© 2026 SmartDevicesHelp.com. All Rights Reserved.


Top Searches in smart devices