In order to connect a Nest Thermostat to Google Home, you need to install both of them first and then follow the below steps to connect the two.
Step 1 : Go to Google assistant.
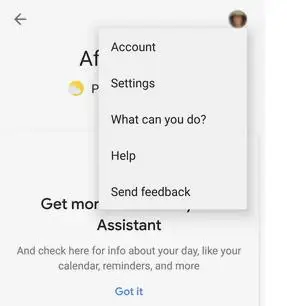
Step 2 : Tap on your profile picture on the upper right corner of the screen to open the main menu and then click on settings.
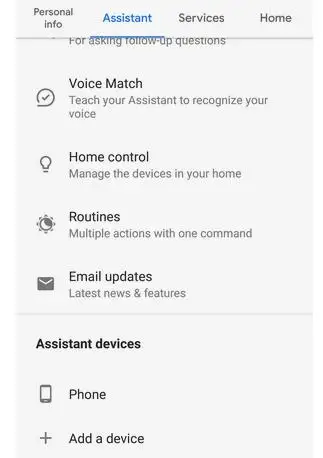
Step 3 : Click on assistant and scroll down to home control.
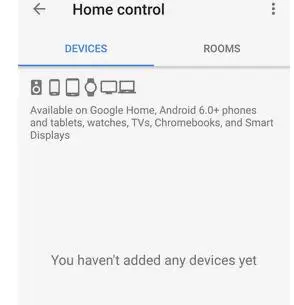
Step 4 : Click on the Devices tab under the Home control and in the bottom right of the screen tap on +
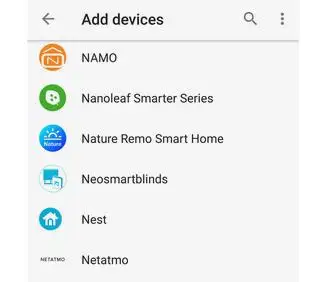
Step 5 : Scroll down and select Nest.
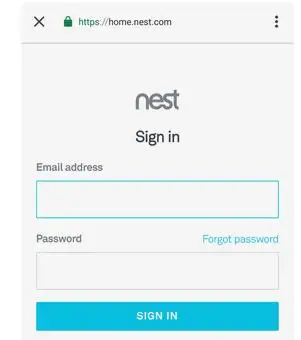
Step 6 : Now it’s time for you to sign in in your account and see your thermostat or any other devices you got.
Step 7 : Assign your devices shown to the location or room in your house.
Step 8 : And finally you are ready to talk to the Nest.
Your Nest thermostat can guide you through a series of easy questions about your home such as what temperatures you prefer or your heating and cooling system. It will use this information to facilitate keep you comfortable and help prevent energy. Turn your thermostat sort of a dial to focus on different choices and press it sort of a button to decide on one.
1. Language : you need to select the language your thermostat will display the commands on along with a time and date format in the language you will choose.
For example, if you select English (US) you’ll see 12 hour time. If you select English (UK) you’ll see 24 hour time. You can also change your language anytime by following to go to settings>language menu.
2. Equipment:
Homeowner or pro: Only if you have installed your thermostat by yourself then you have to select the above option and answer few questions about heating and cooling system.
Dual fuel: you will be asked whether your system is dual fuel or single fuel if your system has a heat pump with an additional heat wire. You might need a trained professional if you have a dual fuel.
Equipment detected: Your thermostat will display the wires it will detect in its connectors. If the wire is missing then you have to pull off the thermostat display and make sure that each wire is properly inserted into the connector and the button is down.
And once you have confirmed that the wiring is correct, your thermostat will ask some questions about your system such as what kind of fuel it uses and
what type of heating you have.
Fuel Source: Your thermostat will ask the questions about the fuel source of the heat and how the heat is being delivered if you have a conventional system installed. The Nest thermostat uses this information to determine how to control your heating and cooling system.
If you know your fuel source, choose it from the available list. You can also choose I don’t know if you are not sure. You can always go back later to change your fuel source in the Settings>Equipment menu.
Type of Heating: You might also be asked whether you have forced air, in-floor radiant, or radiator system for heating.
Forced Air: Warm air comes out of vents or registers throughout your home.
In-Floor Radiant: Electric coils or hot water pipes under the floor heats your home.
Radiator System: Radiators are sealed metal containers filled with hot water, steam or electric coils. They are similar to the in-floor systems, since they don’t use vents or fans, but radiators aren’t installed under the floor.
Heat pump: If you have a heat pump there’s a wire in your thermostat’s O/B connector, your thermostat will ask you the question if you have an O or B wire. Here’s how to choose, test and change your selection if needed.
Choose O or B: check your heat pump’s manual in order to know the type O or B. Most systems have an O wire, so O is a good choice if you can’t tell. If you choose I Don’t Know, your thermostat will automatically select O.
Test Your System: Your Nest thermostat will ask you to run a system test at the end of the setup. Don’t omit this important step and follow the below instructions properly.
Read Latest Articles
Why Is Nest Camera Blinking Green Led Lights?
How To Fix Nest Talk And Listen Not Working?
How Do I Change The Nest Notification Sound On My IPhone?
How To Fix Nest Error E195? - Nest Thermostat
How Do I Get My Nest Camera Back Online?
 Related Blogs
How to Set Up and Use Your Nest Learning Thermostat?
How to Set Your Nest Thermostat Schedule?
What are Eco Temperatures on a Nest Thermostat?
How to Connect a Nest Thermostat to Google Home?
How to Set up a Nest Learning Thermostat?
How can I Change the Owner of Nest Camera?
How To Fix Nest Error E195? - Nest Thermostat
© 2026 SmartDevicesHelp.com. All Rights Reserved.
Top Searches in nest thermostat